Sunday, 24 April 2011

15 Dovecot park - 4

Roofing and felting.

The original roof is stripped back to the trusses , old tiles are kept to the side incase any gypsies may want to collect them free of charge. The original roof trusses have any bumps planed down and any movement squared up if possible. 


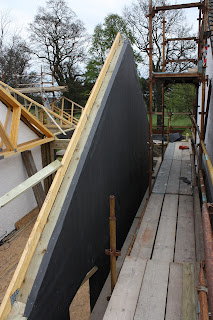
From this stage osb boards which were temporarily used as a flooring to build the kit are brought onto the scaffold and used as boards for the roof. any raised nails , dirt or pieces of wood are removed to ensure the roofing felt is not burst. 


Once the osb has been fixed down the felt is laid , initially with staples to keep them in position , it is important to ensure a good overlap of 200 - 300 mm is given between sheets as well as excess at the edges to ensure no water can penetrate.


Batons and then counter batons provide a grid to hold down the roofing felt and then hold the roof tiles in place. Different types of roofing require different types of baton with different spacings depending on the way the tile , slate or roofing material is applied. 

15 Dovecot park - 3

Building the roof.

Once the gabel end was arected the template truss is brought back into position. Its position depends on the size of over hang of the roof eves and the positioning of the 600 centres for the other trusses. The eves of the roof are supported by a special truss called a ladder. This supports the slight cantilever of the roof eve. 


From this stage the other trusses are broght into position at 600 centres. The shoe of each truss sits in a metal truss hanger or truss clip. braces are nailed into position to stop racking at this stage. It is vital that the trusses run square and parallel because when osb board is nailed on at a later date it will need the supports to be nailed to. The osb replaces the braces and keeps the roof rigid and square as well as being a covering.   


Once the roof trusses are in place the overhang for the roof is fitted so facia and soffet boards can be attached. At this stage it is important to balance out any differences in size and alignment between the old and new roofs caused by using slightly different materials and different standards.


Quite a transformation from the picture at the beginning of this post !


Saturday, 23 April 2011

15 Dovecot park - 2

A quick look at building a kit.


Once the floor joists and in place a binder is attached basically to make a surface for the kit to sit on and be fixed square with the foundations. each section of kit is built in situ. Firstly the wall panels are constructed using 145x47 mm C16 timber. it is important to check the squareness of the timber regularly before applying the osb. uprights are positioned at 600 centres to ensure that there is a timber for the exterior sheets of osb (2400x1200) to be fixed to. Between the uprights dwangs are fixed in order to keep  the panel square and to provide extra strength.


Any opening in the kit will need reinforcement so extra uprights are added around the opening to take the extra load. A lintel is required normally using 2 or 3 lengths of 195x47 c16 timber. If the opening is over 2.1 m a 9mm thick flitch beam is added between the c16's and bolted together  at 600 centres with m12 bolts and washers. When an opening is over 3m the flitch beam is required to be 12mm thick and so on. 


Once the walls are constructed the roof trusses are brought onto the walls. The truss sizes are previously calculated by the manufacturer and are brought to site but lorry. Sometimes trusses are instantly brought into position and fixed using a crane. But some builders who prefer to save the money , or when a site doesn't have crane access it just involves a lot of hard work and effort to be lifted by hand. Which is what my Dad decided to do.


From this point a truss is fixed at the gabel end to be used as template to construct the kit for the gabel end. Again this is constructed in the same way as the previous panels.


The exterior surface of the osb board is covered with a water proof fabric. This ensures that any moisture in the cavity caused by differing interior and exterior temperatures or weather conditions does not penetrate the kit causing rot or dampness. 


From this stage the trusses are then brought into position . An exterior layer of block work in this instance will protect the kit from the elements and a render or cladding then applied. kit ties hold the kit and exterior wall together. 

Friday, 22 April 2011

15 Dovecot park - 1

Before i started working for my Dad on the project that's currently under-way the site was scraped back and covered with hard core. The founds dug and dwarf walls built (I call them dwarf walls , not sure of the real name) That's what the kit sits on on the inside and the outside layer if you like continues up with either block or brickwork which is then clad or rendered. This is all wrapped around the existing house which has had two porches removed and the couple who use it as a holiday home are still living there at weekends, this means its even more vital that the site is kept clean and tidy as well as being very important from a safety point of view. Below I have uploaded a few images of what's going on around the site accompanied by some info explaining briefly what they are all about. 


< Kit sits on top of binder (can just be seen to right of image) 
< Binder
< Joist
< Wall Plate
< DPC layer


< Block dwarf wall (with vents)


< Outer dwarf wall for exterior block work

< Foundations


The above image is of the floor joists meeting with the existing building. A trimmer joist fixed to the wall with m14 tiger bolts then has joist hangers (which can also be used for roof trusses) fixed using a lot of threaded nails. The floor joists sit in the hangers and are then nailed into the trimmer joist and the hangers.

The above image is of a section of kit meeting the original building which can be seen built from Lochgelly red bricks. Packers are used between the original house and kit to ensure the extension is plum and level and not running off with the existing wall which has been effected by subsidence (a problem found with many old buildings especially from this era in fife due to the vast number of mine shafts running through the area). The kit is then fixed using spit hits and m14 tiger bolts.
 Quick image of the contrast between older brickwork and the modern concrete block. (garage)


the above image is of a pad stone which will hold an I beam. Eventually the I beam will hold the roof trusses for the garage.


Thursday, 14 April 2011

My Easter "Holiday"

Over my Easter break I have been working on site with my Dad's construction company. Conveniently allowing me to document some key parts of how buildings go together and the over all experience on site. I have worked with my Dad on a lot of builds and have always been interested in the hands on part of building. In past projects I have fitted windows , done plumbing work , some joinery and digging foundations. But never before have I really recorded any work from an architects point of view, it has basically been get on with the work and i must say its resulted in me being a bit of a pest having to stop and take notes and photographs for my later blogs. 


The project on the go at the moment is in Aberdour, Fife and the client is a reasonably wealthy product designer from York and is wanting to upgrade a 1960's bungalow (which he inherited) into a comfortable home for holidays and later his retirement. Now I must say the building is no architectural masterpiece but from a construction point of view is rather interesting. The house has a lot of subsidence so the existing roof is running off by about 7cm and barely any existing walls are perfectly plumb. A bit of a problem as the house is being extended to all four sides apart from one small area on the north elevation. So marrying in old and new in a "structural" sense is what makes this project rather interesting. The kit for the house is being built on site and the trusses have been manufactured by a company called Muir timber, a local manufacturer. Over the Easter break I hope to document most of the work I have helped with on site from constructing the kit from scratch and erecting the roof as well as other bits and pieces that may be of interest. Although I wont be around to look at the entire build I will hopefully go back towards the end of the project in 5 or so weeks time and post some images of the finished product. 

Sunday, 27 February 2011

Architects can make a difference !!


I have always felt that the most important thing about architecture is that it revolves around people. Everybody needs a home and environment which is comfortable and meets their needs and architects are the people who can really make it happen.  But architecture as a profession and subject often gets a reputation for revolving around the "upper classes" in our society. Especially with television programs such as grand designs becoming ever more popular people and publicising the "toffish" side to life and getting into the heads of the masses that architects only design houses which cost silly amounts of money and really bring about no real benefit to society at all other than make money for developers or satisfy the excesses and luxuries of the rich. 

But architects can make a difference. For example Shigeru Ban a Japanese/International architect who has mastered the technology of "paper architecture". Yes buildings made of paper. A completely recyclable, renewable environmentally friendly material which is lightweight and surprisingly strong when applied in the correct way. Many people in the world of architecture will know or should know of his disaster relief buildings such as emergency shelters for UNHCR, Paper Log House, paper houses for Niigata Earthquake refugees and Post Tsunami constructions in Kirinda. I find work such as this really rather inspiring because he is actually bringing together imagination, technology and comfort into one whole unit which really makes a massive difference to people who have nothing. 

For example paper log house has provided shelter for many refugees who would have been homeless. A solid structure raised off the ground providing shelter, comfort and a hygienic environment that does not only work as a temporary home but meets a huge array of environmental factors such as being made from renewable resources but also when no longer needed can be easily disposed of. The machinery needed to produce such a structure is very basic and cheap unlike other solutions to such problems which often come in the form of a pre fabricated metal container. The possibilities do not end with housing. Any building can be made from paper, schools, community centres, studios and offices. It is not a perm intent solution to problems in third world countries but I think it is a brilliant starting point. 

If I ever did make it to becoming a professional architect I doubt I would feel successful or content with my job if I were solely creating buildings for people with money. But to actually create something which will benefit the wider community, be it affordable housing which is ACTUALLY successful, benefiting victims of natural disasters or buildings which bring together people and communities would make the 7 or so years of studying and spending the Scottish governments money actually worth while. 

images in chronological order : paper log house in Kobe, Japan; axonometric and elevation of paper log house; paper log house in Bhuj, India; drawings of prefabricated cardboard components. 

Monday, 20 December 2010

Some time to clear the mind.


Between being home and the entire country being shrouded in snow I could not resist a wee ramble into the fields this afternoon. It's at times like these that I really do appreciate the technology we have otherwise I wouldn't be able to share with people what a great place I live in and how fortunate I am to be here (I've taken some photos on my phone which you will see below). To just walk out into space where there is nothing around you but near silence and nature , or what you could call complete peace it really is better than any spa or therapy you could have. I advise to everyone at Christmas time to just go on a wonder and enjoy the calm that's all around. Because it really is good for the soul. 


Once upon a time there was a drovers road going along that fence from Powmill to Saline, the road cut right through our garden which at that time was a farm and there was a well, which still exists, for the cattle to drink from. Miscellaneous little fact there. 


 The neighbours.